April 1, 2013

Keep On Sorting, Keep On Sorting

Still sorting this all in my head so it is good to get it written down.

I made a quick list of what we were doing with the stuff that isn't moving with us in this post over here.  Now for all the stuff that is going with us! 

Category B:  Things That Move With Us

Another 4 piles to sort the rest of the stuff into.

1.  Household Goods  (HHG)

This is the large shipment sent by ship that might take a few months to arrive.  It is the bulk of our belongings.  In addition to furniture, this shipment contains things that we don't necessarily need but would really like to have because they make a house a home.
  • furniture
  • appliances
  • lamps
  • bikes/motorcycles (depending on the time of year, bicycles can be a great item to send in your Unaccompanied Baggage)
  • clothes: out of season
  • linens
  • kitchen wares
  • Christmas/holiday decorations (unless you plan to run them off of a transformer, leave your lights in storage)
  • large rugs
  • photos/artwork
  • gardening tools
  • garage "stuff":  tools, workbench
  • books
  • board games/kid toys/craft supplies
  • DVDs/CDs


2:  Unaccompanied Baggage

This much smaller shipment is sent by plane and will ideally show within a few weeks of our arrival.
This is going to be a "starter kit" to help you move into your house and prep for your HHG to arrive.  I'll pack as much varied stuff as I can into this shipment.   There are some items of furniture that will be available on loan until our large shipment arrives: Beds for everyone, table and chairs to eat at.  We can also request a loaner kitchen kit.  Lighter weight items in this shipment means we can send more things.

  • folding table and chairs
  • basic kitchen set (I take the one I have set aside for camping, plus a large pot and real knives)
  • bathmats/shower curtains
    • bikes if the weather will be suitable for them
    • a few small lamps
    • vacuum cleaner if it is dual voltage.
    • simple storage:  large plastic containers and drawers drawers are great to help keep organized. 
    • small area rugs
    • inflatable mattress
    • professional gear that won't be needed right away
    • simple curtains 
    • old desktop computer/speakers
    • dog beds
    • laundry hamper/baskets


    3:  Suitcases and Carry-ons, for the plane:

    If I have room in my luggage, may reallocate some things from Unaccompanied Baggage, but schlepping 2 carry-ons and 4 large pieces of luggage through an airport isn't my idea of ideal.  I'd prefer to travel light even if it means mailing stuff ahead (see point #4) 
    • clothes and shoes
    • medicines
    • paperwork/important files
    • passports
    • pets.  Don't forget to make arrangements for pets!
    • small electronics: ipads, phones (unlocked), laptops, ipods and headphones
    • jewelry 


    4: USPS
    I will take advantage of our new APO address to send ahead a few care packages that will be waiting for us upon arrival. It's nice to think that Unaccompanied Baggage will arrive before HHG or possibly even before us, but this isn't always the case so I'm not counting on it.

    • On our last move I packed sheets and blankets in Unaccompanied Baggage.  We will get loaner beds while we are waiting for ours to arrive, but they don't come with bedding.  The problem is that you can get your UB delivered when you have have found a place to live, but it might not have arrived yet.  Or you may have to wait your turn for delivery.  I learned this the hard way on our last overseas move.  I had to run out and buy sheets.  Even though I found the cheapest ones I could, its no fun spending money when the move is already costing a fortune.  This time I am mailing sheets, towels and some light blankets on ahead.  I will save the receipt and get reimbursed.  
    • It also happens that the kids get out of school after the shipments will have been sent.  There will inevitably be school related stuff that I don't want to carry around for weeks.  There will also be a child's birthday between the pickup and the move.  Any presents that don't fit into luggage can be mailed.
    • We also plan to back up our desktop computer and mail it.  We could take it as excess baggage on the plane.  That is another option.


    March 31, 2013

    Pink! Pink?


    If you we're to ask me to name a color that I definitely did not have in my closet, without hesitating I could tell you the answer is pink.  It is just not a color I gravitate toward - whether it's clothing, furniture, accessories, art.  Not in my house.  Perhaps an occasional deep/hot pink bloom.  Pale pink? Never.  Then I noticed that I had purchased a pink orchid for the bathroom.  It was in partial bloom when I bought it so I must have known.


    Then I picked up the March issue of  Living Etc magazine  and fell in love with the pale pink ultra feminine Chesterfield sofa from  Canvas.


    The nail in the coffin was when I had to run an errand at the mall. Banana Republic was having a 40% off sale.  I saw this great scarf.  Big.  Striped.  Orange and red and pale pink.  And I bought it.


    I bought the scarf with the huge pale pink stripe.  Perhaps I am just realllllly ready for Spring.

    March 21, 2013

    In Search of The Perfect Cheesecake


    I'm so very terrible at sticking to recipes!  When I decide I want to cook something I start comparing at least half a dozen recipes.  Then I tweak it 10 different ways and if it turns out to be delicious I tell the family to enjoy it now because who knows if it will come out the same way next time.  sigh.

    That was the case with the totally amazing cheesecake that I pulled out of my oven a little over a year ago.  It was tall and pale and perfectly cooked.  Then a friend asked if she could have the recipe.  um, sure?

    I remember having consulted Smitten KitchenMartha Stewart, The Joy of Cooking and Fannie Farmer among others.  I used lemon zest and maybe juice, but no vanilla, and loads of cream cheese.  Sour cream?   Flour I don't recall.  Yes, I used a water bath.  I par baked the crust and I think I adjusted the oven temperature lower and allowed it to cool in the oven.  I think.

    My first re-attempt was not what I was hoping for.  Too airy.  Too short.  "Not enough crust" said the family.  But we suffered through and ate it.  Tragic.

    Then it was back into the kitchen.  This time I sort of followed this Smitten Kitchen recipe.  Sort of.

    The Crust:
    I really don't like cleaning the Cuisinart and for graham crackers you don't really need it.  I've found that 1 1/4 tablespoons of butter for each full-sized graham cracker works really well. 


    The Filling:
    I used a hand mixer on low instead of my Kitchen Aid.  It made it easier to constantly scrape down the sides.


    The Final Result:
    Round 2 was more of what I what I was hoping for.  It's dense and creamy.  Lots of crust.  It's about 85% there.  The consistency is a bit too thick - maybe that is the flour?  I like the lemon zest but not the lemon juice.  Aesthetically, I wish it wasn't as yellow but that is pretty dependent on the egg yolks and what the chickens ate.


    Some?Most? people like the skin that forms on the top a cheesecake.  I don't.  I've read that it is the sign of a true homemade cheesecake.  To me it's like having fondant on your cake.  I get out my simple cake leveler and fix that right up.  There is also something to be said for a level oven.  This cake was a smidge unlevel.  That usually isn't an issue so I think when I sealed it for the water bath I didn't make sure it was sitting flat.

    We will again suffer through this current version and I will give it one final tweak...or two... At least I have this recipe in writing to fall back on.


    Crust:
    15 graham crackers (3x5) finely ground
    6 1/4 tablespoons unsalted butter, melted
    1/4 cup sugar
    1/4 teaspoon salt

    Filling:
    4 (8 oz) packages of cream cheese, room temperature
    1 1/2 cups sugar
    2 tablespoons all-purpose flour
    2 teaspoons lemon zest
    1 teaspoon lemon juice
    4 large eggs, room temperature
    2 large egg yolks, room temperature

    Directions:
    1.  Preheat oven to 375 degrees F.  Butter a 9 inch springform pan.  Mix together crust ingredients then press it into the bottom and 2 inches up the sides of the pan.  Bake until set, about 10-12 minutes.   Remove from oven and let cool.  Reduce oven to 325 degrees F.

    2.  Beat cream cheese on low until smooth.  Gradually add sugar, scraping down sides continually.  Add lemon zest, lemon juice.  Add flour.  Add eggs and yolks one at a time.  Make sure you keep scraping down the sides until everything is completely incorporated.

    3.  Boil water for water bath.  Prepare pan by wrapping the bottom in aluminum foil*  to prevent any water from getting in.   Pour filling into springform pan.  Set springform pan into a roasting pan and pour in enough boiling water to come about halfway up the side of the springform.  Bake for 30 minutes.  Reduce heat to 225 degrees F and continue baking for another 1 hour 15 minutes.  Remove pan from water bath and cool completely.  Cover and refrigerate overnight.

    I topped mine with a quick sauce of 12 ounces of frozen blueberries, raspberries and blackberries plus 1/4 cup of sugar, 1/4 cup of water, the juice of 1/2 a lemon and 1 tablespoon of cornstarch all brought to a boil in a sauce pan to thicken and then cooled.


    * I love love love these silicone tops from Lekue.  I use them all the time in the kitchen.  It occurred to me that they are perfect for sealing the springform pan in a water bath.  They are oven safe, form a perfect seal and I never worry about water leaking past aluminum foil.

     
    Serious love.  Happy Dance kind of love.  If I was Oprah, I would pass them out to the audience, if I still had a show and an audience and still did that sort of thing.


    March 20, 2013

    Working With What We Have

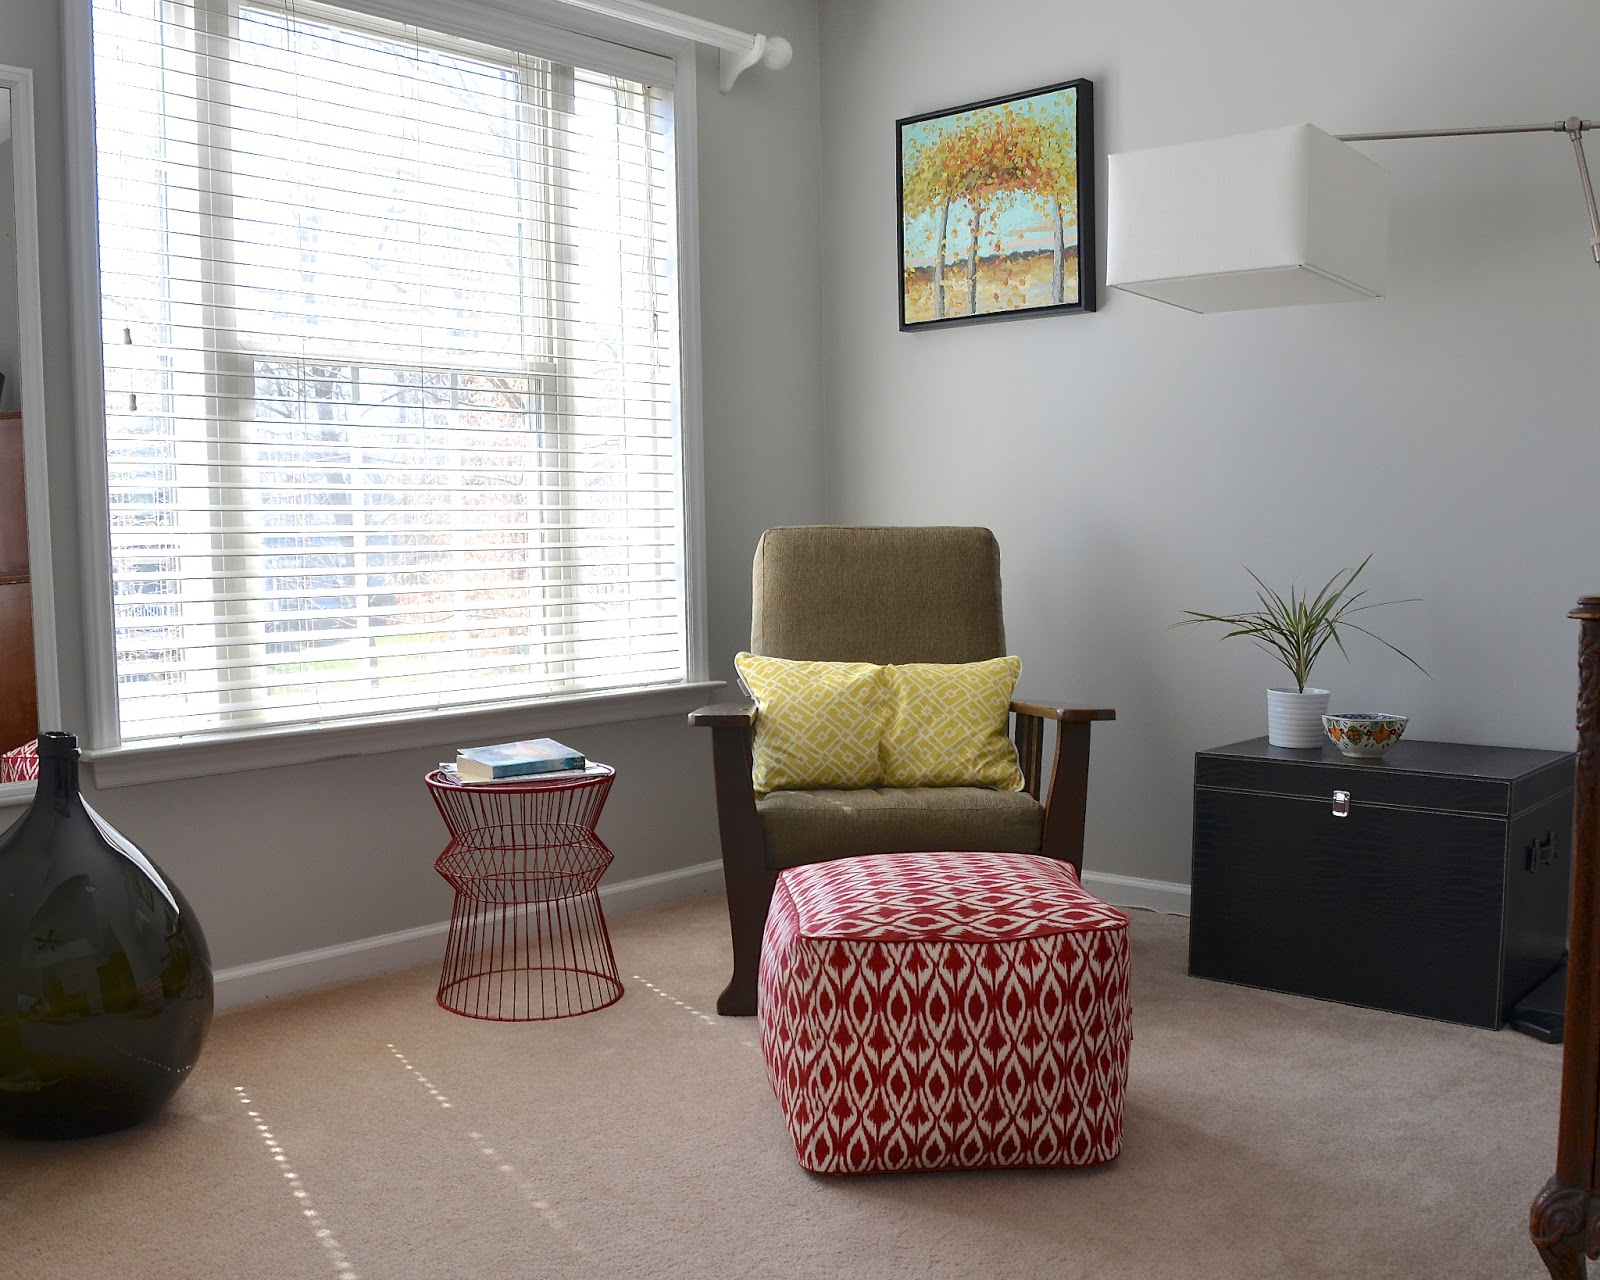
    Do you like my new sitting area?  My honey likes it mucho, probably because it is yet another soft spot to rest his feet.   Keep reading to learn more... 


    I've been wanting to show you my new sitting area and my folded books, which the kids think are totally awesome.  Coincidentally,  Emily A. Clark has a link up for her series Working With What You Have.   Perfect timing, right?


    I'm still sorting, purging, selling, and boxing our things in preparation for our move.  I've also been painting, de-cluttering, and deep-cleaning because our house is going on the market.  Acquiring stuff we didn't want or need just to stage the house seemed completely counterproductive.  Instead, I've been trying to rearrange and use what we already have.

    Depersonalizing our home has meant putting away many of the family photos and children's items (Lego creations, Nerf discs, drawing supplies, Nerf discs) that are usually scattered around the house.  The credenza in the front room was one place that was left wanting.  My solution was to fold a few old paperback books and stick them in a bowl.  It was a simple, free and totally mindless project that makes me want to fold another one and put them in an even bigger bowl.     


    The biggest achievement, however, was managing to create an official sitting area in our bedroom by pulling furniture from around the house.


    The Morris chair had been out of place near the dining table.  The lamp came from the living room where it felt inadequate competing with an even larger shade.  The faux leather chest had previously served as a coffee table by the TV.  The bowl on the chest was nicked from the kitchen.  The demijohn and the little potted plant came from the living room.  The pillow had been languishing in the linen closet.  On the left (it's more obvious in the top picture) you can even seen a sliver of what used to be an orange dressing mirror that I repainted white.  Yes, the pouf is new.  It was originally destined for the porch to add a bit of color but I thought it might work in here with the red wire table.  The whole purpose was to show the potential of this area and I do think we pulled that off.


    Then we hung a bit of artwork and wondered why we hadn't created this space years ago. 


    I've mentioned before how I love local artists!  This piece is by Ellie Reinhold .  Even after we have moved away, I will forever be reminded of the 50+ trees in my front yard and the just-now-quick-count of the 95 out back.

    It is the middle of the day, but I shall turn on the light for you anyway...


    Here's a glimpse at the other side of the room.


    Any pillows we want to throw from the bed get tossed into the demijohn basket.  Someday we will come across some great bedside tables (I hope that someday turns out to be soon after we move to England while we are browsing flea markets.)  The side table pictured was sold as a bathroom storage cabinet and is actually quite functional - 2 drawers and 2 shelves -  but it's a bit tall.  The other side of the bed is graced with a plastic veneered file cabinet and doesn't deserve to be in the picture.

    March 8, 2013

    Quick Fix Footstool

    I'm more a "curl up on the couch" kind of person.  My husband prefers to take a pillow from the couch, put it on small side table and then put his feet up on it.  I put an end to that when I sold the pillows at the garage sale last weekend so a quick fix was in order.


    Old IKEA nesting table to the rescue.


     The nice thing about IKEA furniture is that it is very easy to take apart. 


    I'm trying to embrace patterns a bit more so I bought a small bit of fabric that I thought might give the room some subtle pizazz.  It is not as grellow (greenish yellow) as the photo below makes it out to be.  Definitely more of a deep golden.  The top picture is pretty spot on  - at least on my computer.  Everything else I used was already on hand.   I finally used up all the leftover material I had from these projects here and here.


    I took some Gold Leaf Rub-n-Buff and changed the base.  It is the perfect color with the golden chevrons.  


    And how did my guy respond when he discovered it by the couch?  "It's all I've ever wanted:  a soft spot to rest my feet."  


    March 4, 2013

    Mirror Mirror on the Dresser


    This mirror has seen quite a few layers of paint in its day.  Although the mirror itself is quite large and has a nice beveled edge, the shape of the frame is oh so plain.  After initially choosing to prime it and change the color, I decided to sand it down completely and start fresh.   But once I got started I had a change of heart. 


    I loved the pattern of color that started to reveal itself when I began to sand away the layers.  I stopped, wiped all the dust off and brought it inside for a few days to see if I liked it. 


    I do rather like it.  If I tire of it, I can always get the sander back out and finish what I started.  I don't love shiny gold but I do really like the dark tone of gold that it wore down to.


    There were at least six layers that I noticed.  And that's not counting the pieces of tape I found between a couple layers.  White primer over silver spray paint over dark brown high gloss over and incredibly thick layer of matte grey paint? primer?  Under the grey is the very thinnest layer of gold leaf which had been layered over a deep red.  I'm not sure if the red is a paint or a stain because it does seem to have bled into the original wood frame turning the surface pink.


    This little bunny has no name but he should.  He's been appearing around our house for the past 3 years in random places.  I thought he belonged in the kids' stuffed animal basket but he never seems to stay there.


                                                                  This post was shared on


    Thrifty Decor Chick


    March 1, 2013

    DIY Union Jack Hoodie

    I'm continuing my quest to prepare the kids for England.  Being a little more reserved than his big sister, I decided to make a more subdued version of the Union Jack for the boy child.  Something with a lot less color.  Since he is a big fan of hoodies, it seemed like the ideal vehicle.  Conveniently, he already had the perfect one for this project: a favorite (which means it will actually get worn), pre-washed, and black. 


    I grabbed it out of his closet and told him the plan.  He was more excited that I was making him something than that we were going to paint on his favorite hoodie.  But he got more and more sold on the idea as we started taping.


    Taping up this design made my brain hurt a bit.  I kept on having to consult a diagram to get my bearings. 


    I always love involving the kids in projects.  Especially if it is something I am making for them.


    I wanted the lines to look painted on and worn off.


    We decided to add a bit of silver metallic paint to the grey acrylic.


    He doesn't always wear the hood up, but I wanted to show the pattern on the back.


    With the Union Jack Jeans, I wrapped the flag design around the front of the pants.  This time, the front of the hoodie was being left plain.  I didn't want the design to stop abruptly at the seams so I faded it at random lengths around the sides. 


    Looks like I should have taken a lint roller to him after he decided to wrestle with the dog.


    Subtle in a "there is a giant Union Jack painted on the back of your hoodie" way.