Showing posts with label house. Show all posts

April 14, 2013

Setting the Record Straight

My sweet husband commented that someone reading my posts might assume that all I ever do is cook and do projects when I actually clean all the time too.  Sweet of him to notice.  So, in case anyone was under the impression that all I ever do is craft and cook, here's some of the other exciting stuff I was doing yesterday . . .

This one is pretty self-explanatory. Wash Dry Repeat Repeat Repeat.


I'm also wiping up yellow pollen.  It's everywhere!  I had the windows open when the wind picked up.  The carpet feels like I dusted it with baking soda.  I'm now cleaning pollen from every single surface and window blind.  If it was edible, I'm sure we'd have enough for a meal.


I used the power washer and sprayed down the front porch of all its accumulated pollen.  Then I tackled the front walkway.  There were several years of accumulated dirt and mold.  Every time I finished a square there was such a sense of satisfaction, and every time I started spraying the next one I felt as if I would never finish.  If you power wash barefoot just make sure you keep your toes out of the spray - because it hurts.  Learn from my mistakes and spare yourself.   


I was actually going to make olive focaccia bread but I was out of yeast.  Say it isn't so!  I am trying to use up everything in the pantry/fridge/freezer but it is too soon to run out of yeast.  So, I let the kids snack on the olives instead and I'll pick more of both up at the store today.


March 20, 2013

Working With What We Have

Do you like my new sitting area?  My honey likes it mucho, probably because it is yet another soft spot to rest his feet.   Keep reading to learn more... 


I've been wanting to show you my new sitting area and my folded books, which the kids think are totally awesome.  Coincidentally,  Emily A. Clark has a link up for her series Working With What You Have.   Perfect timing, right?


I'm still sorting, purging, selling, and boxing our things in preparation for our move.  I've also been painting, de-cluttering, and deep-cleaning because our house is going on the market.  Acquiring stuff we didn't want or need just to stage the house seemed completely counterproductive.  Instead, I've been trying to rearrange and use what we already have.

Depersonalizing our home has meant putting away many of the family photos and children's items (Lego creations, Nerf discs, drawing supplies, Nerf discs) that are usually scattered around the house.  The credenza in the front room was one place that was left wanting.  My solution was to fold a few old paperback books and stick them in a bowl.  It was a simple, free and totally mindless project that makes me want to fold another one and put them in an even bigger bowl.     


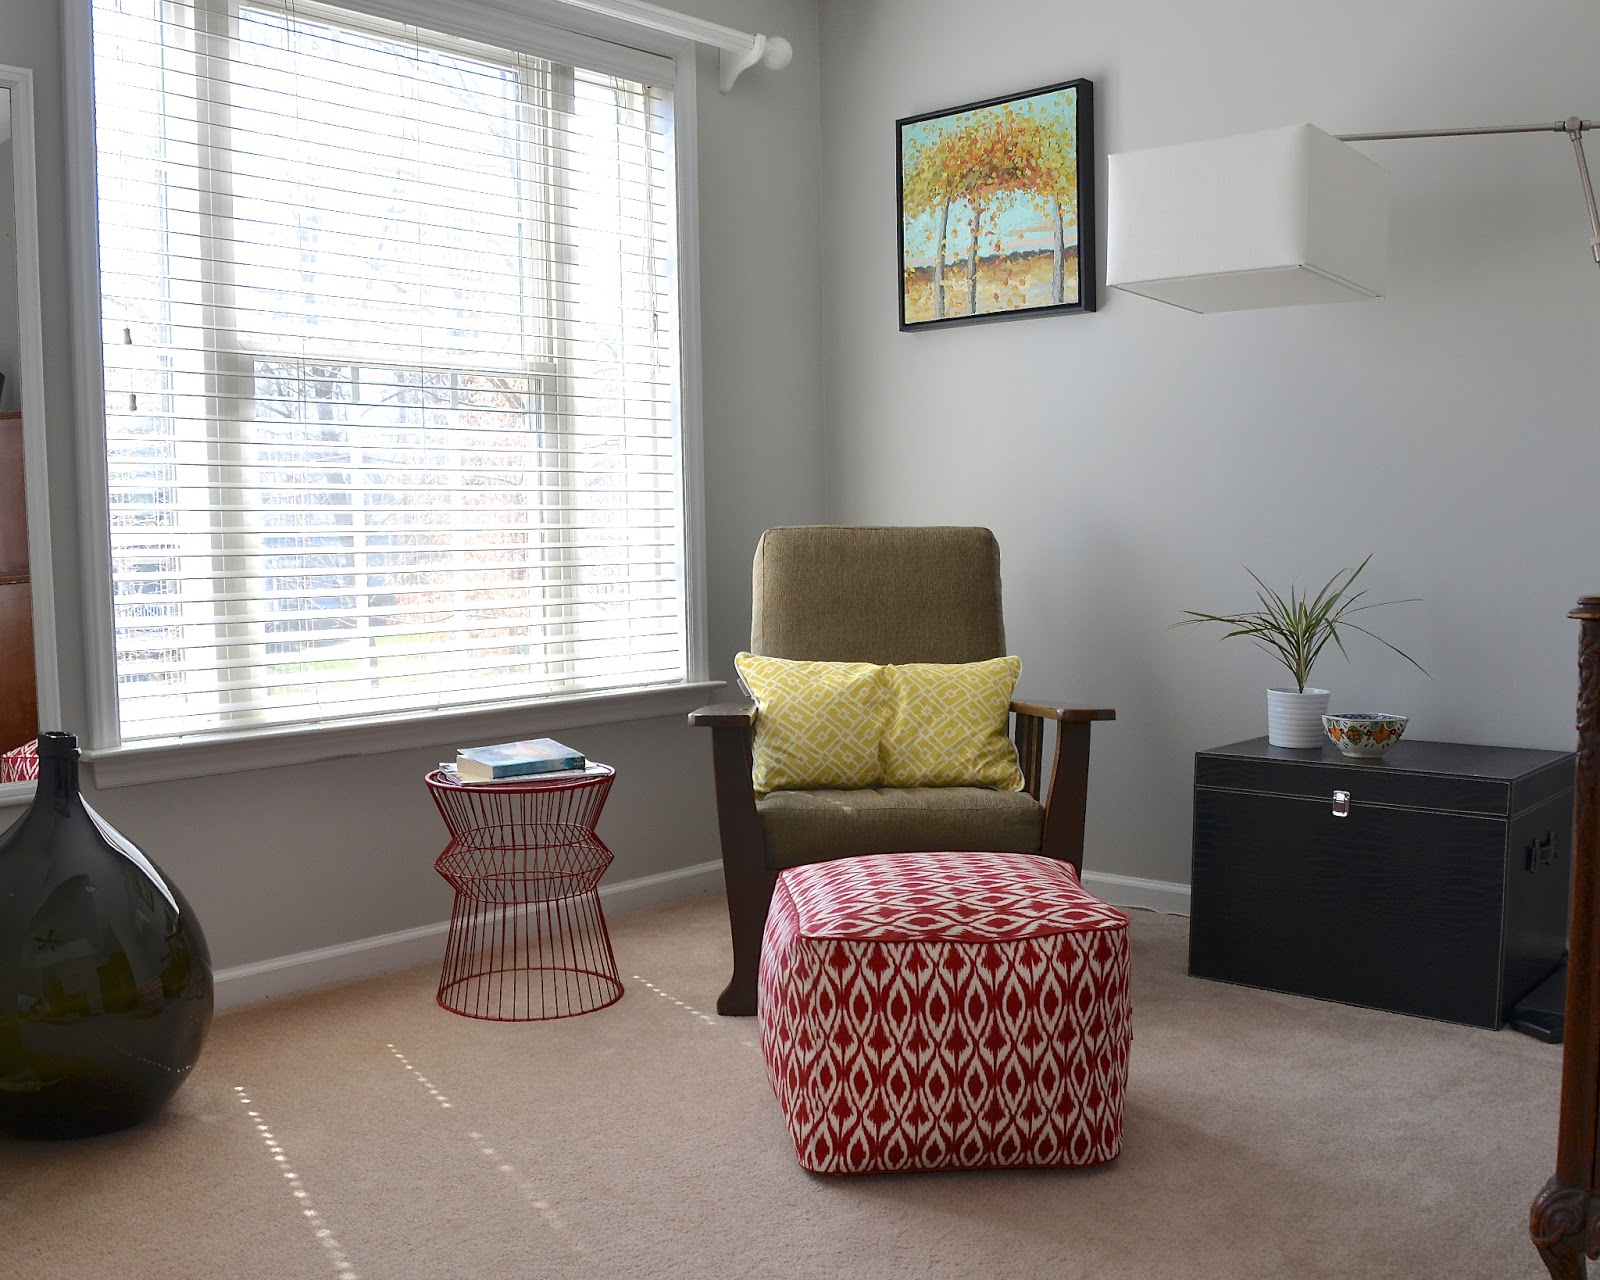
The biggest achievement, however, was managing to create an official sitting area in our bedroom by pulling furniture from around the house.


The Morris chair had been out of place near the dining table.  The lamp came from the living room where it felt inadequate competing with an even larger shade.  The faux leather chest had previously served as a coffee table by the TV.  The bowl on the chest was nicked from the kitchen.  The demijohn and the little potted plant came from the living room.  The pillow had been languishing in the linen closet.  On the left (it's more obvious in the top picture) you can even seen a sliver of what used to be an orange dressing mirror that I repainted white.  Yes, the pouf is new.  It was originally destined for the porch to add a bit of color but I thought it might work in here with the red wire table.  The whole purpose was to show the potential of this area and I do think we pulled that off.


Then we hung a bit of artwork and wondered why we hadn't created this space years ago. 


I've mentioned before how I love local artists!  This piece is by Ellie Reinhold .  Even after we have moved away, I will forever be reminded of the 50+ trees in my front yard and the just-now-quick-count of the 95 out back.

It is the middle of the day, but I shall turn on the light for you anyway...


Here's a glimpse at the other side of the room.


Any pillows we want to throw from the bed get tossed into the demijohn basket.  Someday we will come across some great bedside tables (I hope that someday turns out to be soon after we move to England while we are browsing flea markets.)  The side table pictured was sold as a bathroom storage cabinet and is actually quite functional - 2 drawers and 2 shelves -  but it's a bit tall.  The other side of the bed is graced with a plastic veneered file cabinet and doesn't deserve to be in the picture.

March 8, 2013

Quick Fix Footstool

I'm more a "curl up on the couch" kind of person.  My husband prefers to take a pillow from the couch, put it on small side table and then put his feet up on it.  I put an end to that when I sold the pillows at the garage sale last weekend so a quick fix was in order.


Old IKEA nesting table to the rescue.


 The nice thing about IKEA furniture is that it is very easy to take apart. 


I'm trying to embrace patterns a bit more so I bought a small bit of fabric that I thought might give the room some subtle pizazz.  It is not as grellow (greenish yellow) as the photo below makes it out to be.  Definitely more of a deep golden.  The top picture is pretty spot on  - at least on my computer.  Everything else I used was already on hand.   I finally used up all the leftover material I had from these projects here and here.


I took some Gold Leaf Rub-n-Buff and changed the base.  It is the perfect color with the golden chevrons.  


And how did my guy respond when he discovered it by the couch?  "It's all I've ever wanted:  a soft spot to rest my feet."  


March 4, 2013

Mirror Mirror on the Dresser


This mirror has seen quite a few layers of paint in its day.  Although the mirror itself is quite large and has a nice beveled edge, the shape of the frame is oh so plain.  After initially choosing to prime it and change the color, I decided to sand it down completely and start fresh.   But once I got started I had a change of heart. 


I loved the pattern of color that started to reveal itself when I began to sand away the layers.  I stopped, wiped all the dust off and brought it inside for a few days to see if I liked it. 


I do rather like it.  If I tire of it, I can always get the sander back out and finish what I started.  I don't love shiny gold but I do really like the dark tone of gold that it wore down to.


There were at least six layers that I noticed.  And that's not counting the pieces of tape I found between a couple layers.  White primer over silver spray paint over dark brown high gloss over and incredibly thick layer of matte grey paint? primer?  Under the grey is the very thinnest layer of gold leaf which had been layered over a deep red.  I'm not sure if the red is a paint or a stain because it does seem to have bled into the original wood frame turning the surface pink.


This little bunny has no name but he should.  He's been appearing around our house for the past 3 years in random places.  I thought he belonged in the kids' stuffed animal basket but he never seems to stay there.


                                                              This post was shared on


Thrifty Decor Chick


February 21, 2013

Three Little Birds On My Headboard Part 2


And here it is!


I actually have a headboard!  Yes, there are more than 3 little birds but the pattern is 3 different rows, each with 3 different birds so I went with it.  

Let me remind you of the Before: 


So sad.  There are a few things I should mention:
1.  We repainted the walls in BEHR Dolphin Fin.
2.  I picked out some new bedding that works well for the "I don't like ironing"aesthetic.
3.  The little bird pillow isn't a pillow at all just an extra bit of fabric wrapped around a pillow insert.

OK.  This ended up being a bit more time consuming than I initially thought it would be.  And not just because I had to get out the ironing board. 


I made my own template and some of those curves and angles were not very accommodating when it came to cutting foam or wrapping the fabric.  I actually sketched out 4 designs and asked the family.  This design was unanimous.  


Now you know where all my scraps from my Ikea stool project came from.


After covering the green foam with batting, it was still pretty obvious that there was green foam underneath.  Even with the final fabric over the top, there was still a faint green hue.  I added a layer white cotton fabric to save the day.


I hadn't originally planned on making buttons and tufting.  In fact, I only decided to do that AFTER the entire headboard was finished. But it was at this point that I began to think they might be necessary because the fabric was just not smooth.


In hindsight, I'm glad I waited until the final fabric was on the headboard before I settled for certain on using buttons.  I was able to place them exactly where I wanted them in relation to the rows of birds.  It just came down to quite a bit of measuring to make sure my marks on the back were in the right place.  Then I drilled holes through the wood, threaded a long needle with twine through to the front, added the button and then pushed the needle back through the same hole in the foam and wood.  I used a dozen spare buttons to secure the twine on the back of the headboard.  This worked out really well for holding tension when I tied knots.


Measure twice, drill once.


I took some fabric scraps that I had trimmed off and turned them into buttons with the help of some inexpensive Dritz cover button refills. 


I chose not to add legs.  This headboard is huge enough.  Might I want to position the bed not against a wall?  Probably not, but I will address that issue if it ever arises.  We hung the headboard directly on the wall.  I was thinking of using a flush mount and then we came across these awesome hangers.  Level included!  Bonus!  Slides back and forth for easy centering.  Love em.  Crazy easy to hang.  And sturdy.  Nothing is going to fall on my head while I'm sleeping.


Hangman Products Mirror and Picture Hanging System.


Our bedroom had officially grown up just a little bit.


February 19, 2013

Three Little Birds On My Headboard Part 1

Because we move not infrequently and because we haven't ever found The One and because, truth be told, I don't think it matters all that much, well, we have had the same very basic H-frame for our bed since before we were "we." 


Yup, we've been living like college students for a very long time.  In our defense, we have replaced the mattress.  I'd love to upgrade to a king sized bed but I always have concerns that it won't fit into our next house.  I have decided that, at the very least, perhaps a headboard is in order.

Our bedroom hasn't always looked so very sad.  My fabric inspiration was a very simple project I did for the bedroom back in 2005.  The Issac Mizrahi for Target line came out and I picked up a tablecloth on clearance for under $10.  I loved the bright pop of color.  I cut out my favorite poppy, stretched it around a 4ft x 4ft DIY frame, and hung it on the wall at the head of the bed.  Obviously it isn't there any longer.  Now it hangs in my daughter's room and my bedroom is once again very sad. 


In order to remedy that, I wanted to find a fabric that was fun.  Dare I say whimsical?  Obviously that was a rhetorical question.  I don't like my room to feel stuffy or formal.  On the other hand, its current vibe is a bit too "eat pizza out of a cardboard box in bed."  So here is a tiny hint at what I have decided to do... 


Is that a shower curtain?  Why, yes it is...


February 5, 2013

Flotaki Rug Turned Ikea Hack

1 Flotaki rug + big black dog that loves it as a bed + NC orange soil = not good

2 cheap Ikea stools + sitting for more than 5 minutes  = not good

But . . .

1 Flotaki + 2 Ikea stools =


The MARIUS stools were an inexpensive ($5.99 each) temporary solution last year to seating for the computer desk.  In addition to not being very comfortable, the stools were the cause of much late night cursing as toes were stubbed on the black legs as they sat on a dark rug in an unlit room.

The rug was purchased at Italian home store Ovvio.  It lived in the guest room of our previous home but didn't have a place here.  Plus, I never really took to it.  Which is why it lived in the guest room.   I like the idea of a big thick plush natural wool rug you can lounge on.  The reality of a difficult to clean floor covering in which small items get forever lost wasn't fun.  And any attempt to lounge leaves you in dire need of a lint roller.   


I had materials left over from other projects so I grabbed some scissors went to work.

Here's is how it went down:

Cut circle of rug with a diameter 6 inches larger than seat.  The carpet wasn't very dirty but since the pieces were now a manageable size, I decided to wash them (by hand, like a wool sweater) and start with nice clean material.


Gather pieces of foam and cut to fit.


Line up the pieces and mark them so you can go outside with toxic spray adhesive and glue it all together.


Wrap foam with a layer of adhesive-sprayed batting to help it hold the right shape.


Sort through needles until you find one with a large enough eye to be able to pull a piece of ribbon.


Weave ribbon around perimeter of Flotaki circle about 1 inch from edge.  Leave about 12 inches of extra ribbon at start and finish.


Remove seat base and place on top of cushion.  Pull the ends of the ribbon up snug around the seat and tie.  Have your daughter congratulate you for making a hoodie for the stool.  Tuck the ends of the ribbon under.  The covering can be easily removed to wash or change out for something different.


 Reattach legs.


Decide that it needs "a little something" and search the stash of leftover canned and spray paint for inspiration.  Didn't find what I was looking for so I settled on using an oil based gold Sharpie...


to do this:


Debate whether you prefer them brushed-and-fluffy or more natural-and-course  Remain undecided.


Now that we have "real" chairs for the computer desk these stools don't really have a home but they still get lots of use.  We move them around where ever they are needed and they no longer get kicked in the dark.